Everything I Know About Bread
Great bread only needs four ingredients: flour, water, salt and yeast.
But there are two more: time and temperature. You need to have some control over these too. Time is the more important of the two to get right, but you don’t want to be too far off on temperature.
Great bread also requires humidity while baking. You can do things like add some water to a drip tray in your oven to create this, but for a standard round boule like the kind I bake frequently, the easiest way to do it is by baking your bread in a cast iron dutch oven with the lid on. No extra water required, the steam escaping creates all the humidity your bread needs to end up with a nice chewy crust. (Just make sure the lid doesn’t have a plastic handle.)
If you can do all that, here’s how to make something like this.
All recipes below adapted from Flour Water Salt Yeast.
Ingredients
I don’t have a lot of advice here other than making sure your yeast is fresh. While my gut says I ought to recommend organic flour, the local brands I’ve tried don’t rise all that well in my experience, so I get better results with the mass-produced stuff.
Basic Yeast-only Bread Recipe
Here’s a good training wheels loaf.
Start by planning ahead. Realize that a good loaf takes the better part of a day to fully come together. You can mix the dough in the morning and walk away for 5-6 hours before the next step, but then you’ll want to be around for the next few hours to see it through.
You can do it as a simple all white flour recipe:
- 500g white flour
- 360g warm water (33°C/91°F give or take… warm but not hot tap water will do)
- 10g salt
- 2g instant baker’s yeast
Or as a 40% whole wheat recipe:
- 300g white flour
- 200g whole wheat flour
- 400g water
- 10.5g salt
- 1.5g instant baker’s yeast (or just use 2g if your scale isn’t fine enough)
When measuring, weight is better than volume because it’s precise. Get yourself a kitchen scale if you don’t have one already. And even if you think in ounces, just use grams on your scale, because something like 1.5g is a ridiculous number in ounces.
Rising the Dough
Instead of mixing everything together at once for the dough, start by combining the flour and water and let it sit for 20 minutes to soften up. Use your hands, or use a Kitchenaid if you have one. Don’t bother kneading, just make sure it’s combined. Cover and let it sit for 20 minutes.
Next, add the yeast and salt and blend them in thoroughly. You don’t really need to knead here either. I work the bread for a couple of minutes with my hands by stretching it almost to breaking, folding it over on itself, then twisting it with both hands a bit. Repeat for a few minutes, and it should be good to rise.
Cover and let it sit in a warm place (24°C/75°F, give or take) for 5 hours. After the first hour or two, get your hands wet and fold it over itself a couple of times. (I don’t actually know why this part is necessary, something about extra oxygen… sometimes I forget to do it and my bread turns out fine.) By the end of the 5 hours it should be about 2-3 times the volume. In the winter you might want to go a bit longer if your room temperature is lower.
Proofing
Now you want to flour a flat surface and a fresh bowl and gently work the bread out of its container. Dust your hand with flour and use it as a blade to separate the dough from the edges, and slowly move it out and on to the floured surface. Gently grab an edge of the dough, stretch it up and fold it over itself. Do this a few times around the edge, try not to squish or flatten the dough as you work. Lightly dust sticky spots with more flour, and then gently roll it along the unfloured part of the surface to form a ball. Put the dough into the floured bowl, and cover.
The folding part is tricky to describe, so you may find this video more helpful.
The next step is proofing the dough, and you have a choice here. You can let it sit to proof for an hour, or you can put it in the fridge and proof for 12-14 hours and bake the next day. An hour allows for a quicker turnaround, but overnight proofing produces tastier results.
In either case, you want to let it proof until you can poke it with your finger, and the hole doesn’t spring back fully. It takes a few times to get the hang of what you’re looking for, so if you just follow the timing above you should be good. If you choose to refrigerate overnight, leave the dough cold until you’re ready to bake and transfer it directly to the dutch oven.
Baking
You’ll want oven mitts, things are going to get hot. Pre-heat the oven to 245°C/475°F with the dutch oven inside for about 45 minutes prior to baking. Place the dutch oven and its lid side by side in your oven so that the interior heats fully. If you don’t pre-heat long enough, your bread will stick and rip when you try to remove it, which is no fun.
When your loaf is proofed and ready to bake, use the same hand-blade technique to carefully separate it from the proofing bowl and drop it right into the middle of the dutch oven. Put the lid on, and bake for 30 minutes covered.
Remove the lid, and then bake for 5-20 minutes longer until the crust is a nice darker brown, with the edges just starting to blacken. Everyone’s oven is different here, so watch closely the first few times and get a feel for how long yours takes.
Flip the dutch oven over to transfer the bread to a cooling rack, and let it cool thoroughly. See Storage below for more tips.
Enjoy!
Sourdough Bread Recipe
The process for sourdough is mostly the same, with the addition of living organisms in the starter that you need to keep happy, and a longer time frame to produce a loaf.
I find sourdough bread a lot more complex and interesting, and make it almost exclusively. If you get the timing just right, instead of being overly sour it take on more of a creamy flavour.
I store my starter in the fridge when I’m not baking so I don’t have to feed it every day, which requires revival of at least two feedings before baking. This causes me to choose a time that I’ll bake and plan backwards accordingly. Say I’m baking on Sunday morning – I need to start reviving the starter on Thursday night by feeding it, letting it rise for 24 hours, then feeding it again Friday night. On Saturday morning I mix the dough, and by Saturday evening I’ve started proofing for the next morning’s bake. If you’ve used the starter recently, you can skip the first feeding.
Once you have a happy, thriving starter, you’ll be incorporating a bunch of it directly into the dough and then following the process outlined in the Basic Yeast-only Bread Recipe above. Here’s a basic sourdough recipe:
- 350g white flour
- 50g whole wheat flour
- 290g water
- 180g sourdough starter
- 10.5g salt
- 1g baker’s yeast
Aside from the recipe differences and the starter feeding, follow the exact same process outlined above. For sourdough I like to make sure I’m proofing overnight in the fridge to really allow the flavour to develop.
Feeding the Starter
Your starter is a combination of dozens, if not hundreds of species of bacteria and yeasts. Think of it as a plant: it needs occasional feeding to keep it healthy.
To feed, mix together 100g water, 100g white flour, 25g whole wheat, and 25g starter. (It’s easiest to mix if you combine the starter and water together first into a soupy paste then add the flour.) Store it in a warm place to let it rise. The rest of the starter left over from the last feeding is basically spent fuel, there’s not much you can do with it if you’re not baking, so I compost it. It’s wasteful for sure, so I try to optimize my feeding schedule to keep it minimal.
If I’m not baking regularly, I feed once a week. I pull the starter out of the fridge to warm it up for a half hour or so, I feed it, let it rise for 12 hours, then put it back in the fridge. Sometimes I forget and it goes two weeks between feedings. While that’s a bit risky, aside from greying edges and a funkier smell it’s almost always fine. I killed a starter this way once when I let it go too long and it developed black mold, so there is a risk in not feeding enough.
Getting a Starter
The easiest way to do this is to just ask for some from a friend who already has one. They’re continuously discarding it when they feed it, so they’ll have plenty of extra to go around.
But maybe you don’t have access to an existing starter. No problem, they’re actually a lot easier to make than you’d think. I’ve captured two wild starters, one took a week and the second only took a couple of days.
Extras
Recipe Variations
The recipes above are a starting point. You can play with flour proportions, you can introduce other kinds of flour, you can add other stuff to your bread. Some variations that have worked well for me:
- 200g white flour, 200g whole wheat flour
- 300g white flour, 100g rye flour
- Potato flour with stout instead of water
- Seed blends
- Spent barley (from beer brewing)
- Half a cup of parmesan and chopped rosemary
- Half a pound of bacon
When adjusting flour proportions you’ll probably want to add more or less water, depending on the flour. Whole wheat can use a little more, rye can use a little less. I’d suggest doing a loaf and judging whether it came out too dense (add more water) or too soggy (add less) and trying again after an adjustment.
Fancy Bread
You have a choice. One, you can simply make bread. Or two, you can make fancy bread. For your first few bakes though, keep it simple and skip this part.
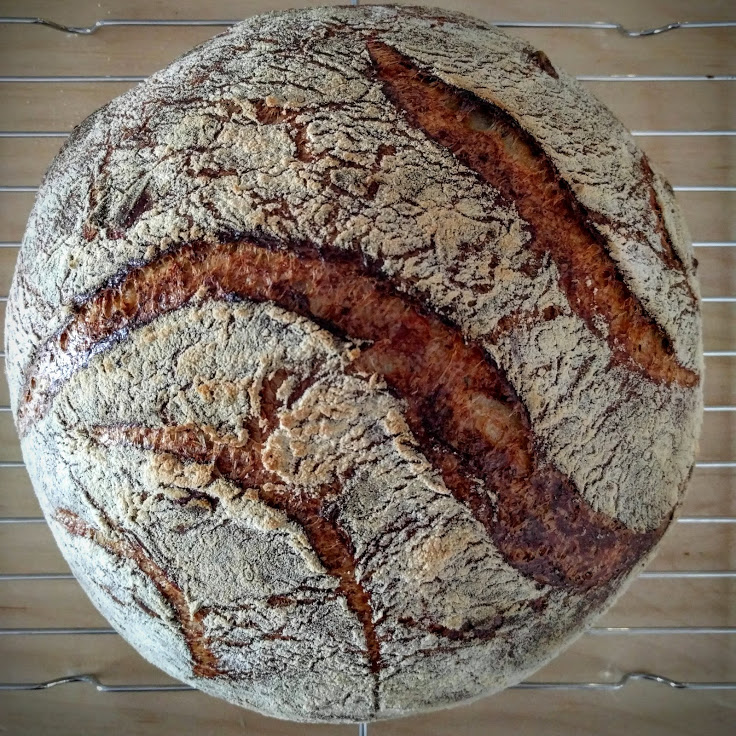
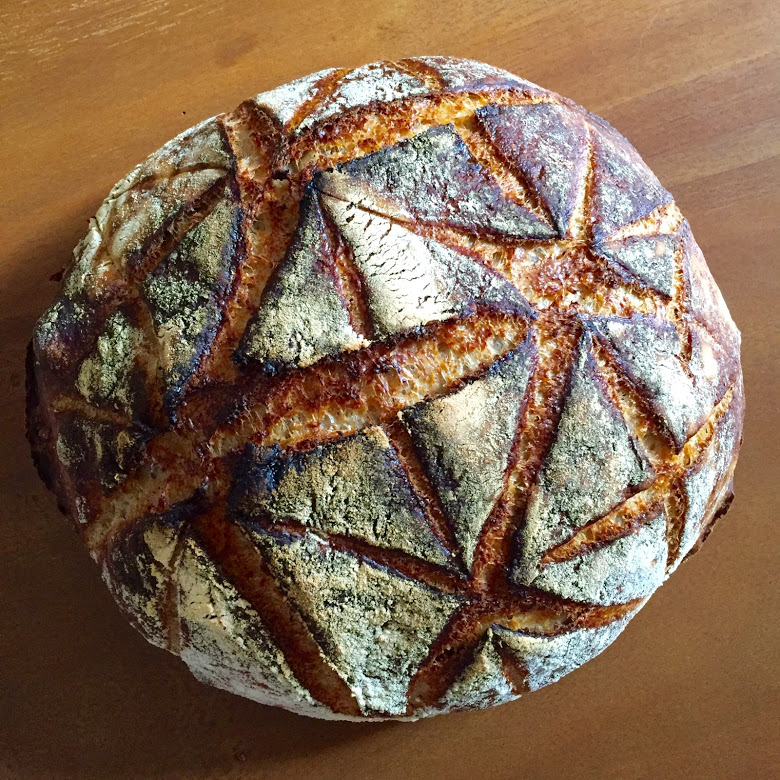
After you have the basics down, there are a couple of techniques you can use to really dress up your loaf. A light flour dusting on top just before going into the oven looks great once it comes out. If you have a pastry brush, run it over the flour to spread it evenly for an even more refined look.
And while bread scoring is a bit of a fiddly art, if you have a really sharp knife nearby don’t be afraid to cut a quick x or criss-cross pattern across the top. A 1/4” deep is enough. Once you get the hang of it, your bread will look like it came from the oven of a professional bakery.
Storage
After you pull the bread out of the oven, you’ll need to let it rest for 20 minutes or so to cool down to a reasonable temperature before slicing into it. And for the first few tries, you’ll definitely want to for that instant gratification of a job well done.
But bread fresh out of the oven is brittle — it has a crunchy, hard crust that flakes and shatters when you cut into it. Since I prefer a chewier crust that doesn’t cause massive cleanup, I let my bread cool completely (8 hours should do it) and then store it in a big ziplock bag on the counter for up to a week to let the humidity soften it up. I don’t store bread in the fridge — it lasts a bit longer in the fridge, but takes on a soggy texture.
Books
If you want to dig deeper, I highly recommend the book I learned most of this from, Flour Water Salt Yeast. It can be a little precious at times and I’ve definitely adapted some of the techniques, but it’s great for foundational theory that you can branch off from.
And I haven’t read it, lots of people swear by Tartine Bread.
Have comments on this? Tweet at me.